This help file and VioLet Composer itself are under constant development. Please feel free to suggest additions and updates by visiting the VioLet Composer SourceForge page.
Save yourself some time and frustration! Please be aware of the following facts about VioLet Composer before you begin using it:
The VioLet Composer SourceForge page contains more information, as well as many wonderful ways for you to contact us and other users, make suggestions or report problems, and to get the latest news on what we're up to. Please visit regularly since new versions are being released at least once a month.
We strongly recommend you skim through this introductory help and/or if you are familiar with trackers like Buzz or Psycle, follow the instructions in red for a quick tutorial (it will take about 5 minutes). First, some background information.
VioLet Composer lets you make music from scratch using your PC, provided you have a soundcard. If you've just loaded VioLet Composer, you can hear a demonstration of what VioLet Composer can do by pressing 'PLAY'. If your audio is breaking up playing the demo, consult the Configuring VC section of this document, and refer to the system requirements above.
VioLet Composer's approach to composing is similar to that of Buzz. First, you create an audio chain using the Wiring Editor, connecting synthesisers and effects together and plugging them in to the 'Mixing Desk'. This audio chain is just like the audio chain in a studio, and consists of audio generating or processing nodes known as machines. There are machines for generating and processing sound in various formats, and it is important to note at this point that there are ways to connect machines that will produce sounds, and ways that will not. You may have to experiment to become familiar with what each machine does.
The second step in composing involves creating 'patterns', or blocks of timed cues for your synthesisers and effects. These cues allow you to play notes, change control values and trigger other events. To create patterns you use the Pattern Editor. The Pattern Editor shows you 'tracks' which you can place commands into. Commands are played from patterns in order from top to bottom. Another important point to note before starting is that many machines expose track 'groups', which must be added to patterns before they can be used. You may add as many copies of whatever groups you need to a pattern, in fact this is how VioLet Composer implements polyphony.
The final step to composing is to arrange your patterns on the master timescale. As your composition plays, you can see the master playback cursor move down the screen in the Arrangement Editor, launching your patterns. This should produce sound if you have provided a working audio path and some cues that will excite it. The Arrangement Editor is also where you set the master tempo, change your composition's title, and other such operations. You can play back all or just a small part of a composition in order to allow you to work on certain parts of your arrangement and then listen to them as part of the whole.
Well, that's the hard stuff out of the way. Don't worry if you didn't catch all that, soon you will be learning by doing these things yourself, and they will make much more sense.
Now we'll just take a quick look at the main controls, then as we move through the various sections of the program, we can begin working on the tutorial.
As you can see, the main window consists of a top section containing things like the song title and playback time, and a tabpage control containing the various sections of the program. A menu bar and a toolstrip provide the top-level functions of the program, like loading and saving, playing and stopping.

Looking at the top of the window you can see the following main controls:
Underneath the main controls, you will see the various tabs that call up the different screens within VioLet Composer. We're going to go through each of these now and do a few simple things in each one. When we're finished you should have your first working composition.
The Wiring Editor is where you connect up your audio path using your mouse. The screen shows the machines as coloured boxes, and connections as lines with arrows on them. The black circles on the machines represent the inputs and outputs of the machines. The inputs are on the left, and the outputs are on the right. Left and right clicking and double clicking has different effects on each of the different parts. If you try them all out, you will find the interface is very simple.
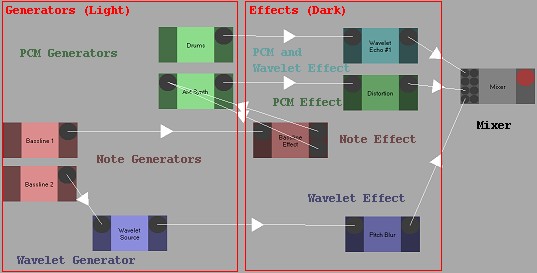
The idea of an audio chain is just like that of a studio. When you start a new composition, all you have is your mixing desk, ready to plug things into. The mixing desk is where you hear sound from, and where you make recordings. If you right click on the 'Mixing Desk' you will see that it has a tick next to the 'Master' option. You can toggle this option for any machine, but usually you will want one master, and that is your mixing desk. Anything plugged in here will be heard during playback and saved during recording.
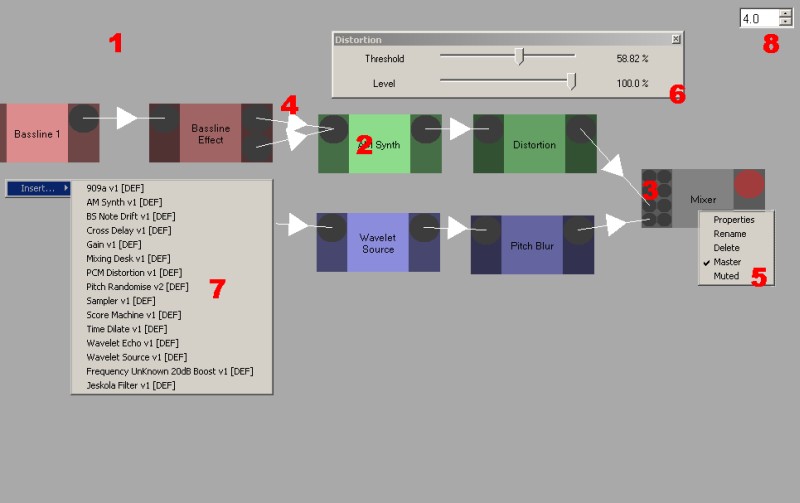
Looking at the various parts labeled in the diagram, we have the following items and functions:
Create an empty composition by pressing New. To create a working playback chain, you need to perform some if not all of the following steps, connecting the machines in the order you add them, and ending by connecting to the master.
The Pattern Editor is where you create patterns to play in your arrangement. A pattern is a small block of cues. This could be a part of a melody, or a signal to slide a volume control from zero to maximum. You can cue anything in your audio path, and using the arrangement editor you may play multiple patterns simultaneously and hence do some very complex cueing.
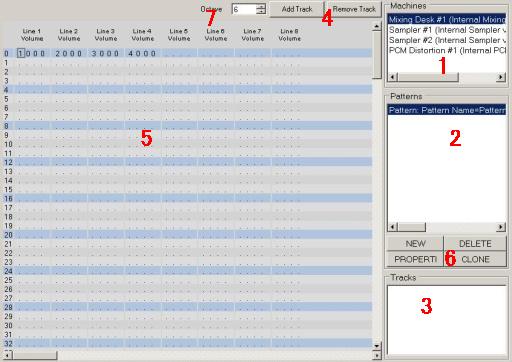
Looking again at the labeled parts of the diagram we have:

Looking at a pattern close up, we can see:
In this section, I will assume you have some knowledge of music. If you don't it won't stop you, but you probably won't really understand what you are doing.
First, select the Score Machine from the list of machines in the top right. Notice that each of the machines you added in the wiring view is listed here.
Below the list of machines, you will see the pattern list, which is presently empty. Click New from the four buttons below the list. You should see a pattern called Pattern #1 appear, and the pattern editor will show you the new pattern. Take some time to look at the pattern and how it is highlighted - what you have is 16 bars of four beats, grouped into groups of four bars.
Below the list of patterns is the list of available track groups for this machine. Select the 'Score, Volume' track group and press the 'Add Track' button at the top of the pattern editor. Do this again. You should now have five columns in your pattern.
Now spend some time clicking and dragging on the pattern editor. Move the cursor with your arrow keys. When you are comfortable with moving the cursor around, we are ready to write your 16-bar duet.
Place the cursor in the very left of the first 'Score' column, at row 0. Press the 'Q' key. You should hear a sound, and a note should appear in the pattern. You have just entered the note 'C', and you will find your computer keyboard has been laid out like a piano keyboard, so '2' is 'C#', 'R' is 'F' and so on. Starting at 'Z' you have another octave. The 'Octave' control at the top of the screen sets the base octave for the 'keyboard'. If it sounds a little strange, don't worry - you're running your wavelets through a dilation effect which hasn't been tweaked yet.
You can use the delete, insert and backspace keys for editing, and you will find that selecting a region and using Ctrl+C,V, or X will work as expected provided you are cutting and pasting like columns.
If you didn't hear any sound, then you probably haven't connected your audio chain correctly. Go back and check the steps you followed for the Wiring Editor tutorial. If you still get no sound, try reloading VioLet Composer and see if the demo song plays. If that makes no sound, you haven't set your soundcard up correctly. Otherwise, you haven't followed the steps correctly.
If you're familiar with music you now know enough to get going, if not, I'm afraid its beyond the scope of this help file to go further into it.
Spend some time experimenting with entering fine-tune for notes (by moving the cursor over and entering numbers) and programming the volume tracks of the machine (again by entering numbers). Test out the transpose and interpolate tools. Note that you won't hear anything when you make these changes, for that you need to play the pattern in the arrangement.
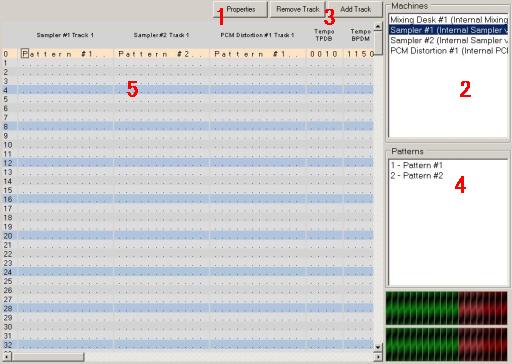
The Arrangement Editor is where you arrange patterns into an overall structure to create your song. There are some mouse driven controls here, and you can move the cursor and select regions in the editor with the mouse, however much of the work is done with the keyboard.
To finish the first phase of the tutorial, simply select the Score Machine and press 'Add Track'. Then you will see that your pattern 'Pattern #1' is bound to the key '1'. If you place your cursor in the Score Machine track and press '1' you will place a cue for your pattern. Place a single cue at row 0 for Pattern #1. Press play to hear your pattern being played by the computer. If you return to the wiring view and double-click on the time-dilation machine, you can drag the slider to change the 'Dilation' control on the machine.
The sample bank is a list of 1000 slots for loading samples (short audio files containing sounds for use in a composition). At present, VioLet Composer supports three types of sample; a PCM audio file, a multi-point envelope, or an oscillator waveform. You can load a WAV or similar sort of file into the program by pressing 'Load', but envelopes and waveforms are created by pressing 'New'. The 'Sampler' machine allows you to play back PCM samples as notes, and can be programmed directly and connected directly to the mixing desk, and it is PCM samples that we will examine first here.
A PCM sample is an audio file, a short segment of digitised sound, which can be played back at any rate. The sound can be a few bars of drumming, a single pluck of a harp string, or an hour of ambient noises from a busy city street. These can be used either once, looped (like the drumming) or constructed into a melody. Samples formed the basis of tracking in the early days, and is still one of the easiest and most fun ways to explore creating music.
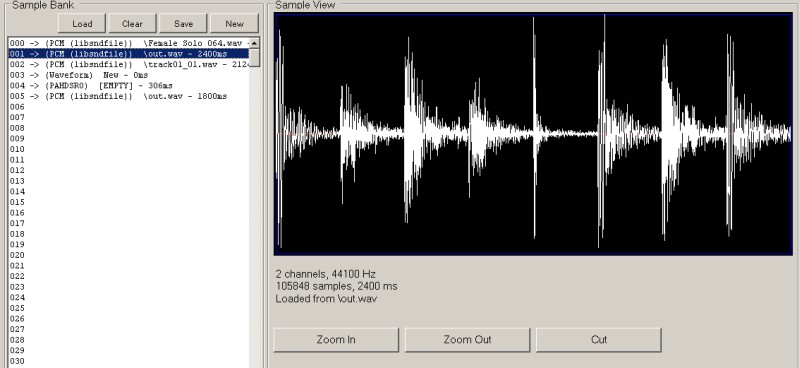
To begin the next phase of the tutorial, go to the wiring editor and add a Sampler machine, and connect it to one of the jacks on the Mixing Desk. Then go to the sample manager. We're going create two new samples. Click on slot 000 (the first slot in the list) and load a WAV file from your hard drive by pressing LOAD. If you don't have any samples, search your Windows directory (generally on C:\Windows) for *.wav, and you will find a few sound files. When you are done, you should see the sample depicted in the sample view, in similar fashion to the picture above.
Now it's time to test your memory. You should be able to remember how to use the pattern manager to create a pattern for the sampler and add a track. If you move your cursor to the 'Sample' column, you can enter in the value 000 for a sample. Believe it or not you've just triggered an event in the sampler, making it select sample 000. If you now move your cursor across to the left of the 'Note' column, and press a key such as Q, you should hear your sample playing. More advanced users may be interested to know that you can press '~' to add the OFF command to a pattern, which stops playback for that track. Now if your memory is really good, you will remember how to add a track to the arrangement and place a cue for your pattern onto the master timescale.
Another type of sample is called an envelope. An envelope is a time vs level graph that can be used to shape (amplify or attenuate) sound, to pan it from side to side, or even to change its pitch. They can be used to drive controls and almost anything else, although at this stage VioLet Composer hasn't even scratched the surface of exploring all these things. For now, one thing you can do it shape the notes from your 'Wavelet Source' machine.
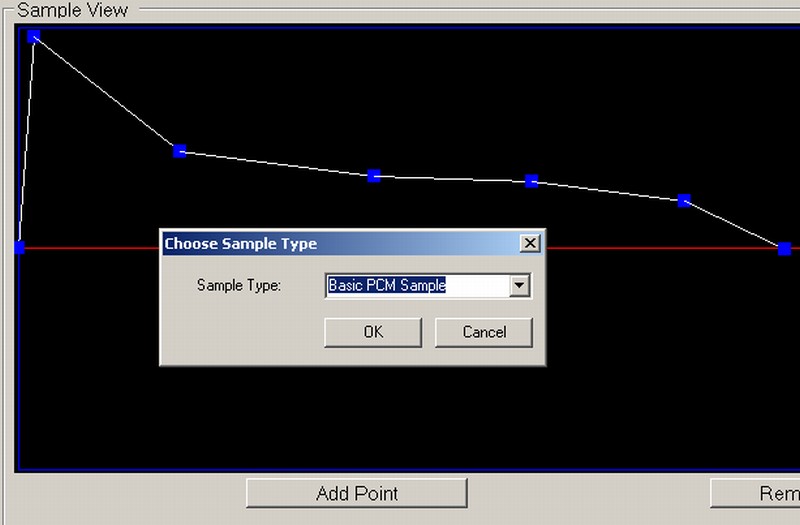
Click on slot 001 and then press the NEW button. You will see a small dialog box asking you what type of sample you want to create. Select 'Advanced ADSR Envelope' and click OK. You'll see a simple triangular shape appear on the screen. You can drag the blue points around with your mouse, but try to leave it in roughly that shape for now.
To apply your envelope, you'll have to create a pattern for the Wavelet Source machine, and place the value 001 in the 'Envelope' column at the top. Then you'll want to add a cue for the pattern at the start of your arrangement. Once the envelope is being applied, you can drag the points on it to hear the effect in real time.
This is the end of the tutorial for now. From here on it is up to you to be willing to experiment to discover more. You will find (we hope) that VioLet Composer is very versatile and continues to grow in scope and capability. You have now seen how to work all the basic parts of VioLet Composer, and only practice, effort and talent will allow you to make good music.
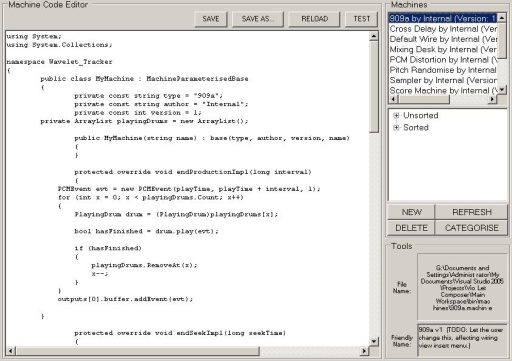
This part of the program shows you the source code for each of the machines in your catalogue. You can edit and create new machines, provided you can handle a bit of C# programming. If you have a basic understanding of computer programming you should be able to figure out the way VioLet Composer works by looking at the basic machines that ship with VC, although not all of these are well commented yet.
For more information on this, download the Machine Writer's Guide, code docs (your API), and if you want, the source code. All these things are available from the VioLet Composer site at SourceForge.
To configure VioLet Composer in a failsafe mode, go to the Audio tab and choose the following settings:
To tweak your audio settings:
The only other really important settings are those for autosaves and for recording. These set your run-time backup preferences and your preferred recording directory respectively.
You can keep a given number of copies of your composition that are written over in a rotating order at regular intervals while the program is open. Set the interval and number of copies to suit your needs - it will usually depend on the stability of three things: your computer, the present release of VioLet Composer, and your personality.
Further information can be found in the following places: